Attach Maps
- What are attach maps plan objects?
- How to view, edit, and save attach maps
- How to print maps from an attach maps plan object
- How to export maps from an attach maps plan object
- How to open additional resources and help links
Attach maps plan objects are:
- Custom plan objects that allow you to view maps from plans and call plans
- Useful when you need to view and edit any map type from a plan or call plan without navigating away from the plan or call plan
- Able to display all map types in one plan object

There are five different map types represented by icons:
|
|
Generic Map |
|
|
Contact Map |
|
|
Team Map |
|
|
Strategy Map |
|
|
Issue Map |
Attach maps plan objects may be viewed and edited from a plan or call plan Table of Contents. If split screen is enabled by your Admin, attach maps may also be accessed by clicking on the Select Tool wrench (![]() ).
).
From the Table of Contents
-
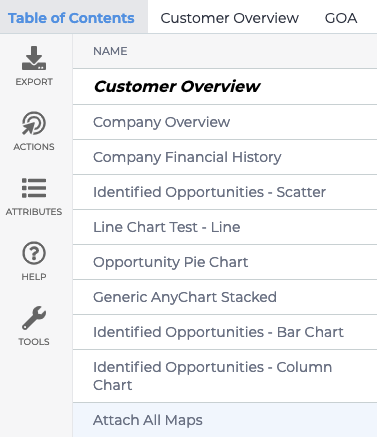
Open a plan or call plan. If enabled, the Table of Contents is opened by default.
-
Click on "Attach All Maps" to open the plan object.
-
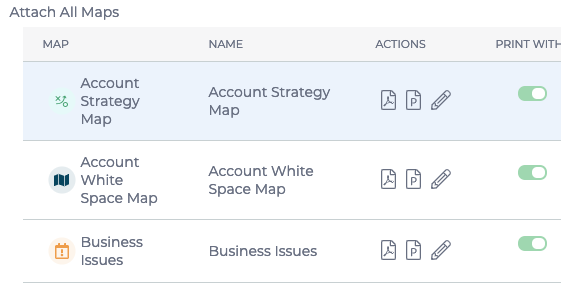
Double-click on a map to edit it. Alternatively, you can click on the edit icon (
 ) in the "Actions" column of the map you want to edit. The map will open in split screen if split screen is enabled by your Admin. Otherwise, the map will open separately.
 -
Click Save to keep any changes made to the map, or click Cancel if you don't wish to save any changes. Cancel will bring you back to the "Attach All Maps" plan object.
From the Select Tool wrench
This option is only available if your Revegy Admin has enabled split screen.
- Open a plan.
-
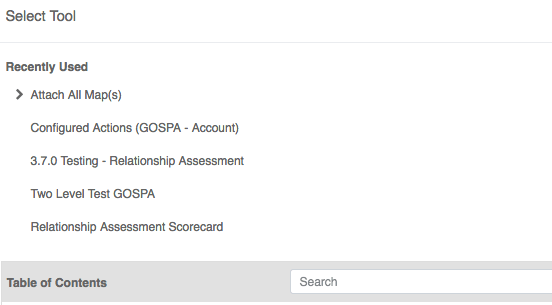
Click on the Select Tool wrench (
 ) on the left side
of the screen. This will open a Select Tool dialog box. An example of the Select Tool dialog box is shown below. From here, the five most
recently used items can be found, or the Table of Contents (TOC) can be searched.
-
Locate "Attach All Maps" by finding it in the most recently used items list or by searching the Table of Contents (TOC). If enabled by Revegy Admin, "Attach All Maps" will open in split screen view. The image below shows an example of the "Attach All Maps" plan object.

-
Double-click on the map you want to view or edit. Alternatively, you can click on the edit icon (
 ) in the "Actions" column of the map you want to edit. The map will open in split screen if split screen is enabled by your Admin. Otherwise, the map will open separately.
 -
Click Save to keep any changes made to the map, or click Cancel if you don't wish to save any changes. Cancel will bring you back to the "Attach All Maps" plan object.

You can print a map to PDF directly from the attach maps plan object.
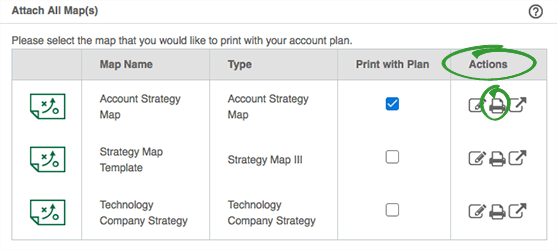
- Click the Print icon (
 ) from the "Actions" column.
 - Depending on Admin configuration, the selected map will print with its associated plan. Plans that will print with the plan will show a check mark in the "Print with Plan" column.
- (optional) Select if you want to include the map legend in the printout.
- Click OK. The PDF opens according to your browser settings.
You can export a map to Microsoft PowerPoint directly from the attach maps plan object.
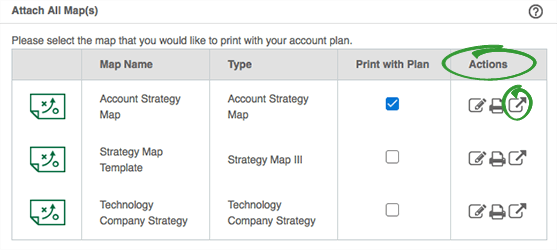
- Click the "Export" icon from the "Actions" column.
- (optional) Select if you want to include the map legend in the printout.
- Click OK. The PowerPoint presentation downloads according to your browser settings.
Additional resources and help links may be attached to a plan object. These resources provide you with supplementary information and tools, for example, a video, a template, or a quick reference guide.
-
Hover over each icon in the top right corner of the plan object to view details.

- Click an icon to open the resource. The display behavior of a website or a document is determined by your browser settings. For example, a website may open in a new browser tab or window.
If you are viewing a plan object from a tab, then the help links are all under one icon in a drop down list. Click each drop down item to access the additional content.