Plans
Plans:
- Are useful in account, opportunity, portfolio/territory, and partner planning
- Are made up of one or more plan objects, or "sections"
- Enable easy collaboration and sharing of information with your team and organization
For account planning
- Support best practices for your regional, national, or global teams
- Keep core plan information and language consistent
- Provide a vehicle for effective planning and collaboration with internal and customer teams
- Provide visibility and insight into current and historical account activity
For opportunity planning
- Support best practices for managing opportunities and planning for a successful on-time close
- Provide a common framework to identify opportunity health, risk, gaps, coverage, red flags, and the right close plan
- Help you and your team focus on and close the right deals faster
For account planning
- Use plans to share captured intelligence around the customer with your team.
- Avoid using multiple account plans per account when possible to avoid confusion and create a central location for information.
- Use account plans for joint account planning with customers to provide a single location for storing important information, such as goals, actions, and progress.
- Use plans during review processes.
For opportunity planning
- Use plans for quick communication of an opportunity status to your account team, management, and executives.
- Build a sequence of events collaboratively with your customer to drive accountability, leadership, and credibility.
- Build a close plan and an action plan that internally drives accountability and execution.
- Review before and in team/deal reviews so that everyone is up to date.
- Use plans to capture coaching notes to help drive the next steps.
- Avoid sharing opportunity plans with customers. If certain elements of the plan help you in collaborative planning with your customers, then produce a sanitized/limited version of your plan for external use.
- Navigate to portfolio/territory, an account, opportunity, or partner.
-
Hover over the "Plans" drop down list from the main top navigation menu, and click View Plan List.
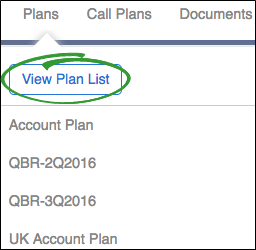
An example of the plan list is below.

- Name: User-given name of the plan
- Type: Name of the plan configuration selected when the plan was created
- BR: Indicates if the plan is selected to print in the briefing report
- Status: Indicates if the plan is currently being edited by another user
- Last Updated By: Name of the person who last updated the plan
- Last Updated: Date and time of the last update in the plan

- Click on any column header to sort the list by descending or ascending order.
- Use the "Search Plans" function above the plans list to filter plans.
- As you type your criteria, the list filters.
- You can search plans by name.
- Click New in the plan list.
-
Enter the plan attributes, including the Plan Type, Name, and if the plan should be included in the briefing report.
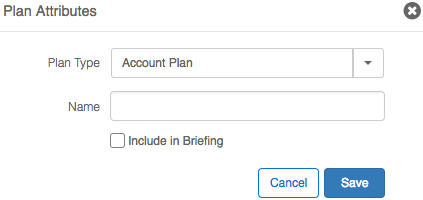
- Click Save. The new plan template opens and is available for you to edit.
Required plans are plan configurations that are essential to the success of your accounts, opportunities, partners, and portfolio/territory.
Required plans display in the plan drop down menu and are marked with "NEW" in orange. An orange number indicator appears beside the "Plans" drop down header.
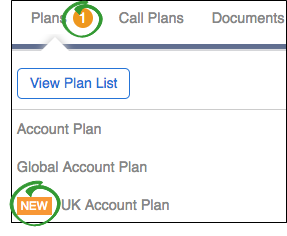
- They are only indicated as required before they are created.
- Click a required plan in drop down list to quickly create a plan using the required configuration.
- Once a required plan is created, the indicators are removed unless the plans are deleted.
- If no plan using the required configuration exists within your record, the required indicators are re-added.

- Highlight a plan in the plan list.
- Click Open.
|
|
Note: Hover over the "Plans" drop down menu, then select a specific plan to open it without viewing the plan list. |
- Click the Attributes icon (
 ) in the left side menu of an open plan.
 -
Click Edit Attributes.

-
Edit the plan details, including renaming the plan and whether to include the plan in the briefing report.
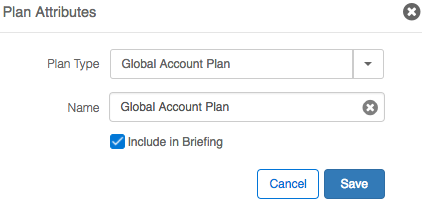
- Click Save.
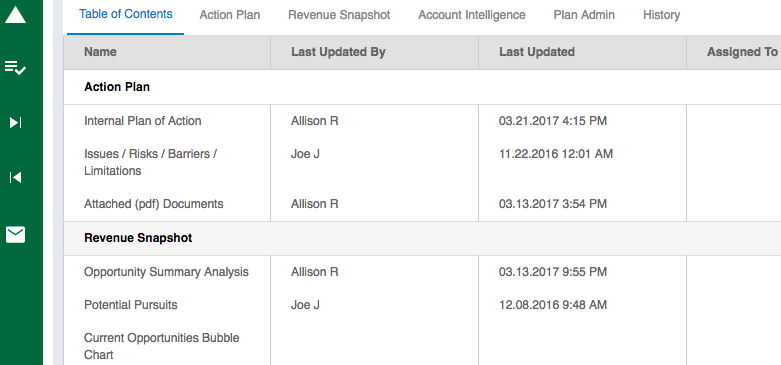
Plan objects may be assigned to specific team members. This allows your team to divide and conquer, ensuring the best qualified team member is responsible for the right information. Assigning team members to specific plan objects drives accountability and assists with collaboration.
|
|
Note: Plan objects may only be assigned if the plan is configured to display the Table of Contents, and Notes Box plan objects may not be assigned. |
Assign
-
Click the Assigned To field in the Table of Contents of an open plan.

-
Select a team member from the "Assign Plan Object" drop down list.
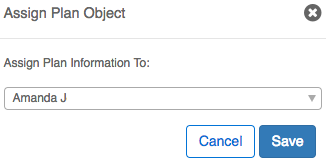
- Click Save.
Reassign
To reassign plan objects to team members, repeat steps 1-3 for assigning team members, selecting a new team member from the drop down list.
Unassign
To unassign plan objects to no team member, repeat steps 1-3 for assigning team members, selecting "unassigned" from the drop down list.
Plans are made up of one or more plan objects, or "sections." Each section may be edited independently from the other sections.
Click the links below to view how to edit each type of plan object from the Table of Contents.
Standard plan objects
Standard plan objects are available to everyone.
- Free Form Text Box
- Notes Box
- Table: Many Column
- Table: Two Column
- Grid Questions
- Table: Related List View
Custom plan objects
Custom plan objects are specially configured by the Master Company Admin, which is typically the Revegy team. Please contact Revegy Support at support@revegy.com for questions regarding custom plan objects.
- Attach Maps
- Attached Docs (PDF)
- Configured Actions
- Generic AnyChart Chart
- Opportunity Summary Analysis
- Related Plans
- Task List with Alerts
- Team and Team (External)
Universal Save
When editing either a Standard Plan Object or Custom Plan Object, it is possible to edit multiple sections within a single tab. Unlike editing from a widget, there will be one universal save button in the top right-hand corner.
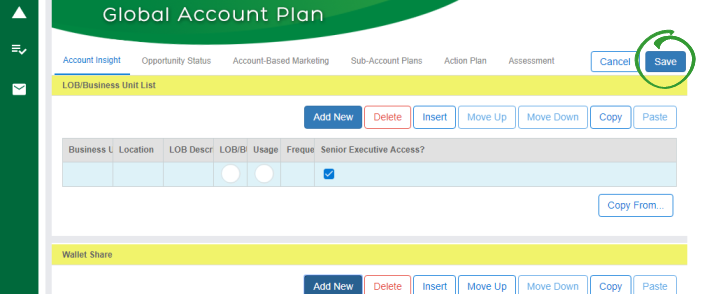
If a section has been edited, its title bar will turn yellow. The image above shows two sections have been edited during one session.
When saving, if a section is unable to be saved due to an error, that section's title bar will turn red and will contain information on how to fix the error. A common example of an error is missing input for a required field.
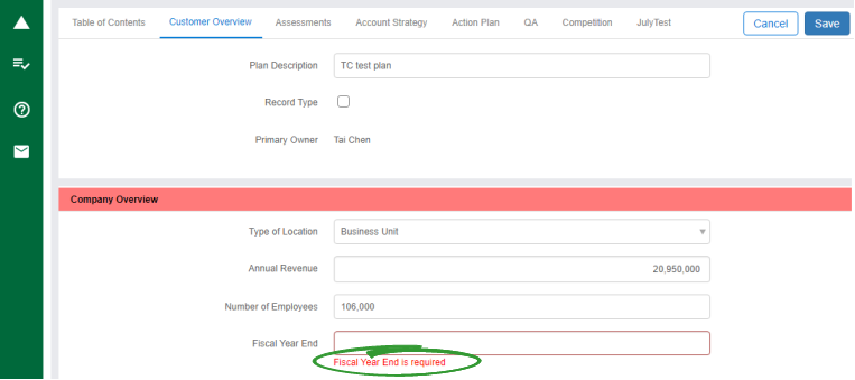
Any other sections that were edited during the same session without error will be saved as normal.
Split Screen view is available for use with plans and their associated plan objects. In order to use Split Screen, it must first be activated from the Revegy Admin Module [System Preferences].
With Split Screen active, you can view and edit plans and their plan objects at the same time. To use this feature, first select a plan with plan objects attached.
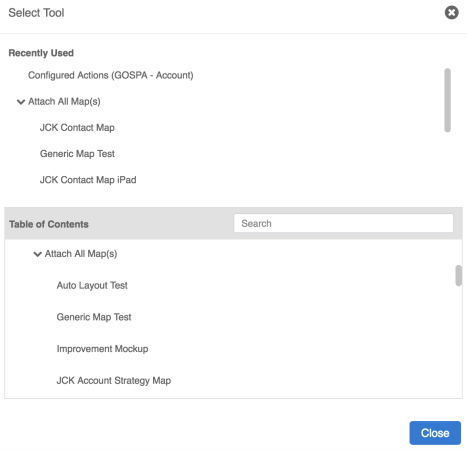
Then click on the Select Tools icon (![]() ). A dialog box will appear that contains the five most recently used plan objects, table of contents (TOC), and a search bar that can be used to explore the TOC. Plan Objects that are selected using the TOC will open in split screen. You can now proceed to make changes
as you would normally. The screen that is currently active for editing will be highlighted in blue.
). A dialog box will appear that contains the five most recently used plan objects, table of contents (TOC), and a search bar that can be used to explore the TOC. Plan Objects that are selected using the TOC will open in split screen. You can now proceed to make changes
as you would normally. The screen that is currently active for editing will be highlighted in blue.
To exit Split Screen mode, drag the split bar to the far right to close out the right-hand side information or to the far left to close out the left-hand side information. The split bar is the middle bar separating the two views, identifiable by three vertical dots.
Additional resources and help links may be attached to a plan. These resources provide you with supplementary information and tools, for example, a video, a template, or a quick reference guide.
- Click the Help icon (
 ) in the left side menu of an open plan.
 -
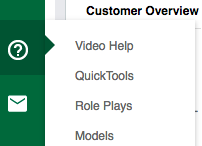
Click an option in the Help menu. The display behavior of a website or a document is determined by your browser settings. For example, a website may open in a new browser tab or window.
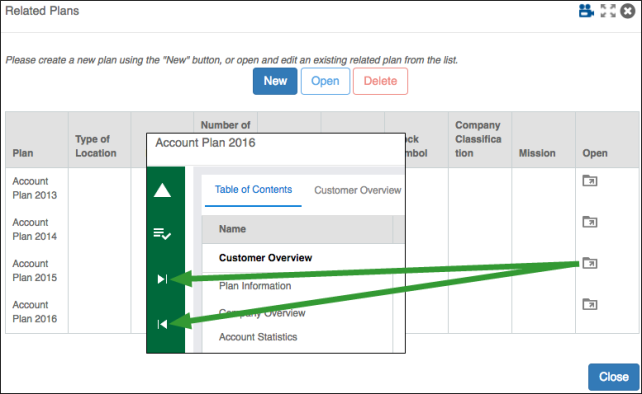
Sub-plan navigation may be enabled for some plan types (templates). When enabled, the "next" and "previous" icons are available on all plans within the same record that share that same type.
Sub-plan navigation is also useful in Related Plans plan objects. When sub-plans are opened directly from the plan object, you have the ability to switch between the sub-plans without opening and closing each individual plan.
Depending on your company's configuration, sub-plans may be hidden in the plan list and/or in the main plan drop down menu.
To navigate between sub-plans, click the Previous Sub-Plan (![]() ) and Next Sub-Plan"(
) and Next Sub-Plan"(![]() ) icons in an open plan or from within an open plan in a Related Plans plan object.
) icons in an open plan or from within an open plan in a Related Plans plan object.
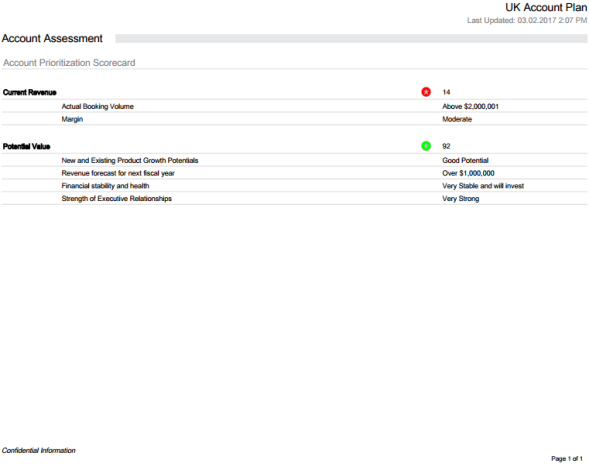
Plans are printed to PDF. The PDF opens in a new internet browser window/tab so that you may save the PDF wherever you need.
- Click the Actions icon (
 ) in the left side menu of an open plan.
 -
Click Print.

-
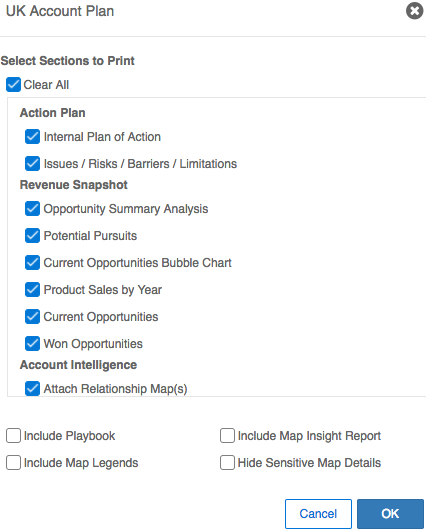
Select which plan objects to include in the PDF.
-
(optional) Select to include any or all of the supplementary pieces.
-
Click OK. The plan opens as a PDF.
Plans are exported as Microsoft PowerPoint presentations. The presentations save and download to the destination you have selected your internet downloads to be stored.
- Click the Actions icon (
 ) in the left side menu of an open plan.
 -
Click Export.

-
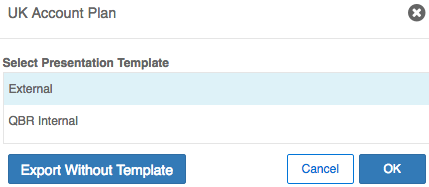
(if applicable) Select a predefined presentation template. If you do not want to use a template for your export, select Export Without Template.
-
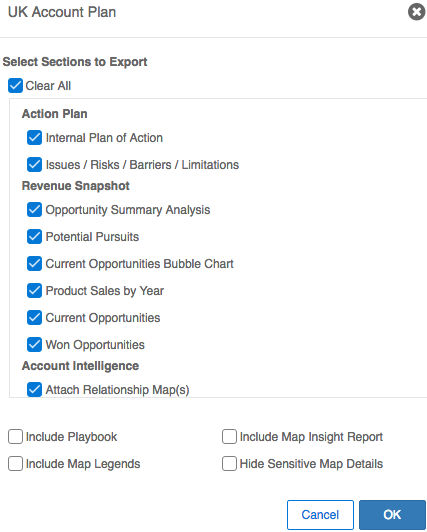
(if applicable) Select the plan objects to include. This window is only available if you selected "Export Without Template." If you selected a predefined template, plan objects are exported based on the template keys included in the PowerPoint template.
-
(optional) Select to include any or all of the supplementary pieces. This option is only available if you did not select a template.
Option Details Include Playbook Includes the active playbook if one is set Include Map Legends Includes the map legends for maps that are included Include Map Insight Report Displays map attributes for each contact that has been added to any contact map for the selected record
Include Sensitive Map Details Hides all information on maps marked as "sensitive" - Click OK. The plan saves and downloads as a PowerPoint presentation.
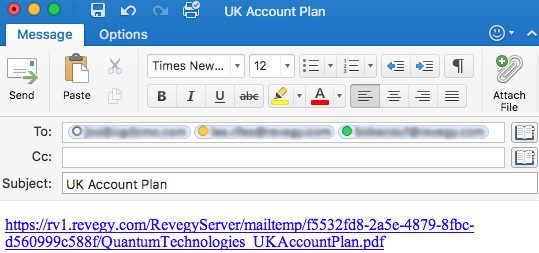
Plans are emailed using your default mail application. The plan is included in the body of the email as a link to a PDF download of the plan.
- Click the Email icon (
 ) in the left side menu of an open plan.
 -
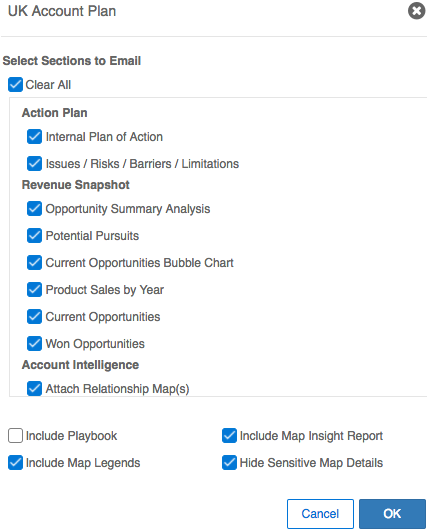
Select which plan objects to include in the PDF.
-
(optional) Select to include any or all of the supplementary pieces.
Option Details Include Playbook Includes the active playbook if one is set Include Map Legends Includes the map legends for maps that are included Include Map Insight Report Displays map attributes for each contact that has been added to any contact map for the selected record
Include Sensitive Map Details Hides all information on maps marked as "sensitive" -
Click OK. The plan opens your default mail application and attaches a link to a PDF download of the plan.
Plans are archived as PDFs and stored in the "Documents" section for the currently viewed record.
Archiving is helpful for taking snapshots of major changes and progress within your accounts and opportunities.
- Click the Actions icon (
 ) in the left side menu of an open plan.
 -
Click Archive. The plan saves as a PDF in the "Documents" section for the currently viewed record as "[Plan Name] [Current Date and Time]."


|
|
Note: Deleting a plan is permanent. It is recommended to archive the plan before deleting it. |
- Highlight a plan in the plan list.
- Click Delete.
- Click Yes to confirm the deletion.